Home
» News
»
Ledger vs. Trezor vs. Tangem vs. GridPlus: Which Hardware Wallet Is Best for You in 2026?
Ledger vs. Trezor vs. Tangem vs. GridPlus: Which Hardware Wallet Is Best for You in 2026?
Short answer: if you are new to hardware wallets, the best choice depends less on a single security score and more on how you plan to use and recover the wallet. Ledger is the strongest all-round choice for broad asset support and a polished mobile-first ecosystem; Trezor is especially compelling if open-source transparency and flexible backup standards matter to you; Tangem is the simplest pocketable option for people who want NFC tap-to-sign convenience; and GridPlus Lattice1 is built for power users who value a large secure screen and readable smart-contract signing.
This comparison was checked against official product and support documentation on September 14, 2026. Hardware, firmware, supported assets, integrations, prices, and regional availability can change, so verify the specific model and chain you need before buying.
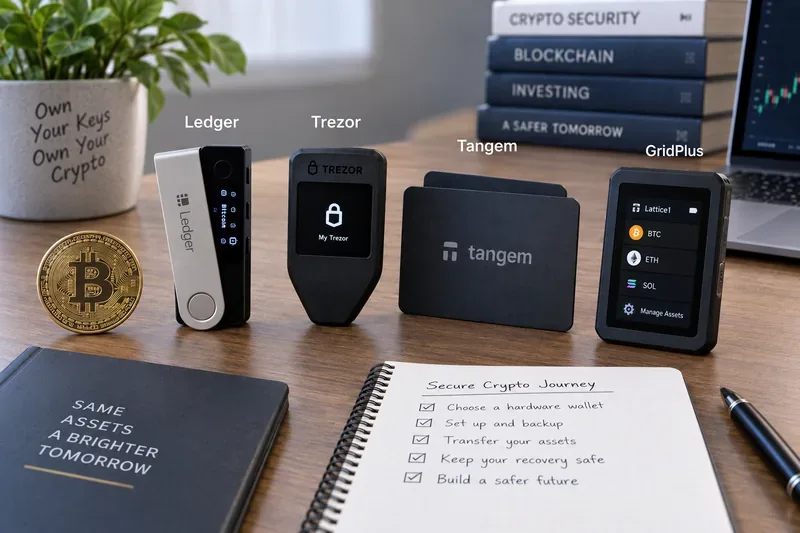
Four hardware-wallet approaches side by side: compact Ledger and Trezor devices, card-style Tangem hardware, and the larger GridPlus Lattice1 format, illustrating why screen size, portability, and backup workflow matter as much as brand name.
First, understand what a hardware wallet actually protects
A hardware wallet does not store your coins. Your crypto remains recorded on its blockchain. The device protects the private keys that authorize transactions. When the design works as intended, those keys stay inside dedicated hardware while the device signs a transaction without exposing the secret key to your internet-connected computer or phone.
You will also see the term Secure Element. This is a chip designed to resist physical extraction and tampering. An EAL rating, such as EAL6+, refers to a Common Criteria assurance level for a component or evaluated target. It is useful evidence, but it should not be treated as a universal scoreboard proving that one complete wallet is automatically safer than another.
Another important term is clear signing: showing meaningful transaction details on a trusted device screen so you can verify what you are approving. This becomes especially important when using DeFi, NFTs, multisig wallets, or smart contracts, because simply keeping keys offline does not protect you if you confidently sign a malicious request.
The quick comparison
Wallet ecosystem
Best fit
Key strength
Main tradeoff for beginners
Ledger
Multi-chain users who want mobile and desktop convenience
Broad asset and third-party wallet support; current touchscreen models use certified Secure Elements
Ledger OS is not completely open source
Trezor
Users who prioritize transparency and recovery flexibility
Asset support can vary by model and sometimes requires third-party wallets
Tangem
Mobile-first users who want the smallest learning curve
NFC card/ring format, EAL6+ Secure Element, optional seedless backup across devices
No independent hardware display for reviewing transaction details
GridPlus Lattice1
Active DeFi and smart-contract users
Large 5-inch secure touchscreen and automatic EVM ABI decoding for readable signing
Large, less portable, more expensive, and narrower wallet/integration footprint
Step 1: Decide how you will actually use the wallet
Choose Ledger if you want a broad, general-purpose ecosystem
Ledger currently offers several devices rather than one single hardware wallet. Its newer touchscreen signers, including Ledger Nano Gen5, Flex, and Stax, combine a Secure Element with USB-C, Bluetooth, and NFC on supported models. Ledger says the Nano Gen5 uses an EAL6+ certified ST33K1M5 Secure Element, while its official asset directory lists support for thousands of assets through Ledger Wallet and compatible third-party wallets.
That makes Ledger practical for someone who holds Bitcoin, Ethereum, Solana, stablecoins, and other networks and does not want to change hardware every time their portfolio expands. Current touchscreen devices also provide larger interfaces for reviewing transaction details than the older Nano-style two-button experience.
The transparency tradeoff is worth understanding before purchase. Ledger states that much of its ecosystem is open source or reviewable, including Ledger Wallet, APIs, SDK components, and embedded apps, but low-level Secure Element firmware remains closed under chip-vendor restrictions. Read Ledger's official open-source explanation and the supported-assets directory before deciding whether that trust model suits you.
Choose Trezor if open-source design and backup flexibility come first
Trezor's strongest differentiator is its long-running open-source approach. Its current Safe line combines this philosophy with dedicated Secure Elements. The Trezor Safe 7, for example, uses two Secure Elements plus a hardened MCU, a 2.5-inch color touchscreen, Bluetooth, USB-C, and Qi2-compatible wireless charging. Trezor also supports standard wallet backups and Advanced Multi-share Backup, which can split recovery responsibility across multiple shares.
For a beginner, the practical benefit is not that open source magically eliminates risk. It means the firmware and design can be independently inspected, while the larger on-device screen makes it easier to confirm addresses and prompts. Trezor explicitly warns that even secure hardware cannot save you if your backup or passphrase is exposed.
Choose Tangem if your priority is tap-and-go simplicity
Tangem takes a very different approach. Its hardware wallet is a card or ring with an EAL6+ Secure Element that communicates with a compatible smartphone over NFC. In normal use, the phone sends an unsigned transaction to the Tangem device, the device signs internally, and only the signed transaction returns to the app. Tangem currently lists dozens of supported networks, including Bitcoin, Ethereum, Solana, Base, XRP Ledger, and many EVM networks.
The biggest beginner-friendly feature is its backup model. In a standard seedless setup, you create two or three equivalent Tangem devices. The private key is securely copied to the backup devices during the one-time backup process; afterward, each device can access the same wallet. Second-generation Tangem wallets can alternatively generate or import a 12- or 24-word BIP39 recovery phrase.
The important tradeoff is verification. The card itself has no screen, so it cannot provide the same independent, on-hardware visual review offered by a Ledger touchscreen, Trezor screen, or Lattice1. If you mostly transfer established assets and value extreme portability, that may be acceptable. If you routinely approve complex DeFi transactions, a secure display may matter more.
Choose GridPlus Lattice1 if you sign complex transactions frequently
GridPlus Lattice1 is the least pocketable option here, but that is intentional. It uses a 5-inch secure touchscreen designed to show detailed signing information. For Ethereum and other EVM chains, GridPlus can automatically decode smart-contract calldata using Application Binary Interfaces, or ABIs, so supported signing requests are easier to interpret instead of appearing as opaque hexadecimal data.
The Lattice1 supports Bitcoin, Ethereum and EVM chains, and Solana through supported integrations. GridPlus lists MetaMask, Rabby, Frame, NuFi, MyCrypto, and Ambire among compatible wallets, with capabilities varying by chain and integration. SafeCards provide an additional hardware backup/account mechanism.
This is a strong fit for an active DeFi user who sits at a desk and signs smart-contract interactions often. It is a weaker fit for someone who wants a wallet in a pocket or needs the broadest native multi-chain app coverage. Regional availability is another practical constraint: GridPlus's current shipping documentation lists several excluded destinations, so check availability before building your setup around it.
Step 2: Choose your recovery plan before moving any crypto
This is where many first-time buyers focus on the wrong thing. The device is replaceable; your recovery method is not. Before transferring meaningful funds, decide how you would recover after losing the device, phone, or home.
Ledger: supports a 24-word Secret Recovery Phrase, and current next-generation signers can also use the PIN-protected Ledger Recovery Key. Ledger Recover is a separate optional subscription service; it is not required to use the wallet.
Trezor: supports standardized 12-, 20-, or 24-word backups depending on configuration and model, plus multi-share options on supported devices.
Tangem: can use two or three hardware devices as backups without a written seed in its standard workflow, while second-generation products also support optional BIP39 seed phrases.
GridPlus: supports mnemonic recovery and SafeCard-based backup. GridPlus itself recommends thinking through redundancy rather than relying on a single SafeCard as the only backup.
A sensible beginner test is simple: before depositing a large balance, confirm that you understand exactly what you would need to restore the wallet if the primary device vanished tonight. Do not test recovery for the first time during an emergency.
Step 3: Verify compatibility before you buy
Never assume that the phrase “supports thousands of coins” means every feature works in the manufacturer's own app. Hardware support, native app support, staking, NFT handling, dApp connectivity, and third-party wallet support are separate questions.
Make a list of your actual requirements: for example, Bitcoin cold storage, Solana staking, Base DeFi through Rabby, or Ethereum multisig through Safe. Then verify each workflow in the manufacturer's current support pages. This is more reliable than choosing based on the largest marketing number.
Step 4: Set up the device safely
Buy from the manufacturer or a clearly authorized seller and inspect the package and authenticity checks described by the vendor.
Install only the official wallet software. Type the official site yourself or use a verified app-store listing rather than clicking a wallet link from an email or advertisement.
Let the hardware generate a fresh wallet unless you intentionally need to restore an existing one.
Write recovery words only when the official device workflow instructs you to do so. Never photograph them, put them in cloud notes, email them, or type them into a website.
Verify the receiving address on the hardware display when your device provides one. For screenless Tangem hardware, carefully verify the transaction in the official app and understand that you do not have a separate hardware display to cross-check it.
Send a small test transaction first. Confirm that the funds arrive at the expected address before moving the rest.
Mistakes that matter more than the brand you choose
The first mistake is treating a recovery phrase as a password. It is closer to a master key: anyone who gets it can generally recreate the wallet without possessing your hardware device. No support agent needs it.
The second is blind signing. A hardware wallet cannot protect you from a transaction you deliberately approve when the destination or contract action is wrong. Read the trusted display where available and reject anything you do not understand.
The third is skipping a recovery drill. A beautifully secured wallet is still fragile if you have one paper backup in the same bag as the device, or if your family cannot follow a documented recovery plan when necessary.
The fourth is buying for a feature you do not use. A large signing screen has enormous value for frequent smart-contract activity, but less value for a person who moves Bitcoin twice a year. Conversely, a tiny card is wonderfully portable, but portability does not replace independent transaction verification for a high-frequency DeFi user.
Which hardware wallet should a beginner buy?
For most multi-chain beginners, start with Ledger or Trezor. Both provide mature ecosystems, strong hardware isolation, physical confirmation, and broad support. Choose Ledger if you want extensive mobile connectivity and broad third-party integration; choose Trezor if open-source transparency and flexible standardized backups are higher priorities.
Choose Tangem when your main goal is an extremely portable mobile experience and you are comfortable with a screenless hardware device. Its two- or three-device backup approach can remove the anxiety of managing a seed phrase, but you still need a deliberate plan for where those backup devices live.
Choose GridPlus Lattice1 when readable smart-contract signing is central to your workflow and a large desktop-oriented device is a feature rather than a burden. Its secure screen and ABI decoding are particularly relevant for active EVM users, but check wallet integrations, supported chains, shipping availability, and total cost first.
There is no universal winner because the failure modes differ. The best hardware wallet is the one whose transaction-verification and recovery process you can follow correctly every time. Before buying, write down your chains, devices, dApps, backup plan, and travel needs; the right choice usually becomes obvious once those requirements are concrete.