Home
» Knowledge
»
Exploring Bitget’s Futures Trading Interface: A Practical Step-by-Step Guide
Exploring Bitget’s Futures Trading Interface: A Practical Step-by-Step Guide
Bitget’s futures trading screen brings several decisions into one workspace: which contract to trade, how much margin to commit, what leverage to use, which order type to send, where to place take-profit and stop-loss instructions, and how to monitor or close a position afterward. The interface is compact, but each control changes the risk profile of a trade.
This guide focuses on the Bitget website and uses USDT-margined perpetual futures as the main example. It was checked against Bitget’s official support materials available on September 19, 2026. Bitget has been moving users toward its Unified Trading Account (UTA), so some account-balance and funding controls can differ from older “classic account” tutorials. The order-entry concepts, however, remain broadly consistent. Futures are leveraged derivatives and can produce rapid losses, including liquidation; this guide explains the interface rather than recommending any trade.
Quick reference: what each area of the futures screen does
Interface area
What it controls
What to check before using it
Contract selector
Chooses USDT-M, USDC-M, or Coin-M futures and the trading pair
Settlement asset, contract type, liquidity, and current contract parameters
Margin mode
Sets cross or isolated margin behavior
How much account equity can be exposed to a losing position
Leverage
Changes required initial margin and position exposure
Liquidation distance, position size, and maximum leverage allowed for the pair
Order type
Controls how and when an order reaches the market
Price certainty, execution certainty, slippage, and time-in-force behavior
TP/SL controls
Creates conditional exits
Trigger price source and whether the resulting order is market or limit
Positions panel
Shows open positions and risk metrics
Mark price, unrealized PnL, margin, liquidation estimate, leverage, and TP/SL
Close controls
Reduces or exits a position
Quantity, order type, reduce-only behavior, and current market liquidity
Step 1: choose the futures product and trading pair
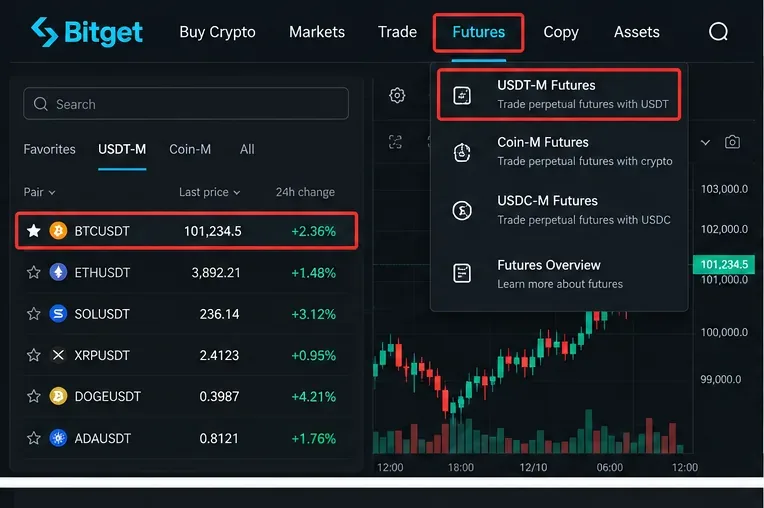
From Bitget’s top navigation, open the Futures section and choose the futures family you want to use. Bitget currently supports USDT-M Futures, USDC-M Futures, and Coin-M Futures. The choice matters because the margin and settlement asset differ. USDT-M contracts are commonly used in examples because the contract is margined and settled in USDT.
Next, select the pair. On the website, the pair selector is typically near the upper-left area of the trading screen. Bitget’s official beginner guide uses BTCUSDT as an example, but the same workflow applies to other supported contracts. Contract parameters can differ by pair, including maximum leverage, tick size, maintenance margin requirements, and order-size limits. Bitget specifically notes that these parameters may change with market conditions, so the live contract information should take priority over remembered limits from older guides. See Bitget’s official beginner guide to trading futures and Bitget’s futures functionality overview.
Start by choosing the futures family and trading pair. The live contract page is the best place to verify current leverage and trading parameters.
Step 2: understand whether your account uses classic balances or UTA
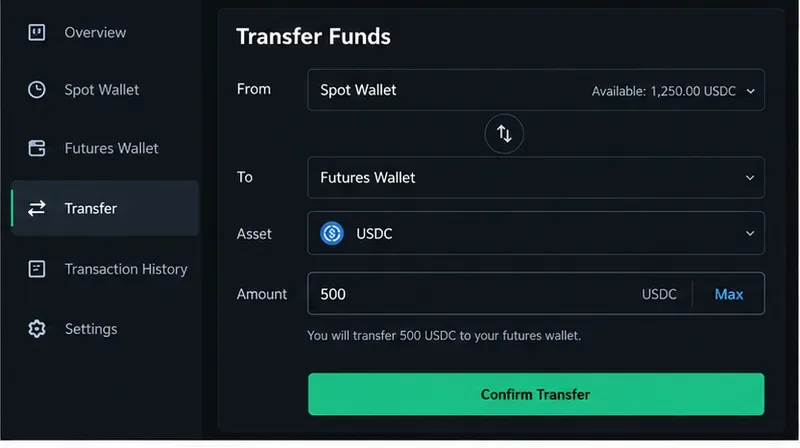
Older Bitget guides tell users to transfer funds from Spot into a Futures account before opening a position. That still applies to classic-account workflows. However, Bitget’s Unified Trading Account changes this model: supported spot, margin, and futures products can draw from a shared balance, so internal transfers between product accounts may no longer be necessary.
Bitget announced in June 2026 that the UTA was open to all users. In a UTA, margin behavior also depends on the selected account mode. Before following any older transfer instructions, check Settings > Account Mode and confirm whether your account is classic or unified. Bitget’s current UTA overview explains that unified balances, cross-product PnL offsets, and collateral treatment differ from classic accounts. See Bitget’s Unified Trading Account overview and Bitget’s UTA availability announcement.
Step 3: choose cross or isolated margin deliberately
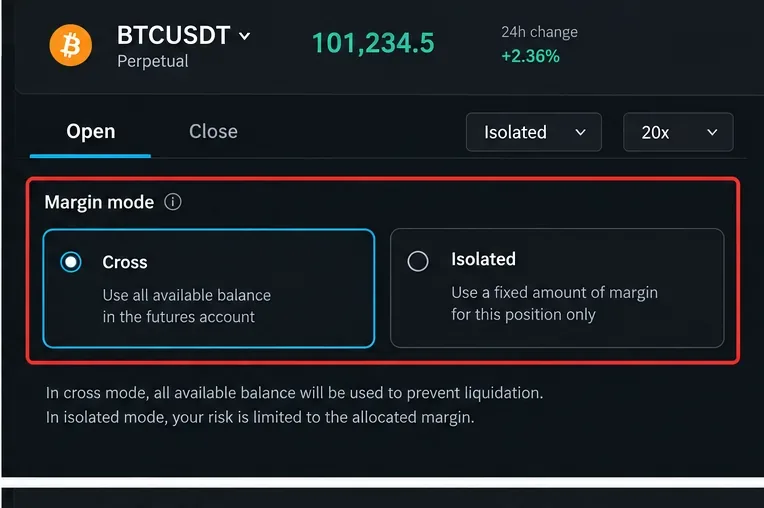
Before entering an order, locate the margin-mode control. Bitget supports cross and isolated margin. In cross margin, available funds in the relevant margin pool can be shared across positions. This can give a position more room before liquidation, but it also means losses in one position can affect a broader pool of funds.
In isolated margin, margin is allocated to an individual position. Bitget’s official terminology guide explains that the risk of long and short positions is calculated independently and that only the margin assigned to that position is exposed to liquidation in the isolated setup. This makes isolated margin useful when you want a more clearly bounded position-level risk pool, although it does not remove liquidation risk.
Cross margin shares available margin across positions, while isolated margin allocates margin to a specific position. Check the mode before every new trade.
For definitions and current behavior, use Bitget’s key futures terms guide. If you use UTA, also check the account-mode documentation because margin pools can behave differently from classic-account futures.
Step 4: set leverage and understand what it changes
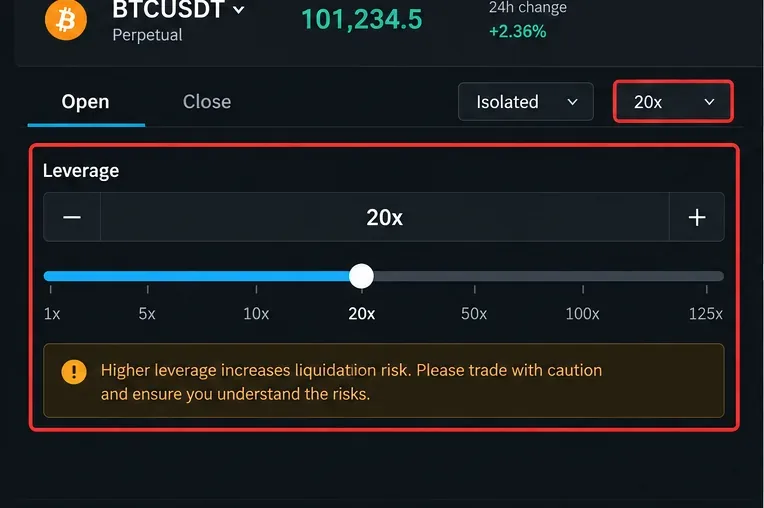
The leverage selector is usually adjacent to the margin-mode control. Bitget states that futures leverage can range from 1x up to the maximum allowed by the specific trading pair; its current futures overview says some pairs support up to 150x. The maximum is not a target. Higher leverage means less initial margin is required for the same notional position, but it also narrows the distance between the entry price and liquidation conditions.
Before confirming leverage, focus on the resulting position value, initial margin, and estimated liquidation price, not just the multiplier. Bitget’s 2026 initial-margin guide notes that the amount required to open a position is influenced by position value, leverage, fees, and potential opening loss. The order window or confirmation dialog may show an estimated initial margin before submission.
The leverage control changes margin requirements and liquidation sensitivity. Use the live order-cost and liquidation estimates rather than judging risk from the multiplier alone.
Step 5: choose the order type and enter the trade parameters
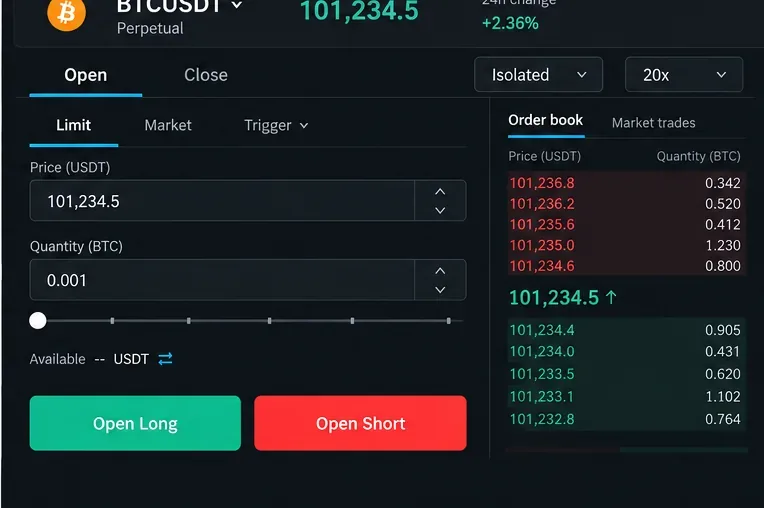
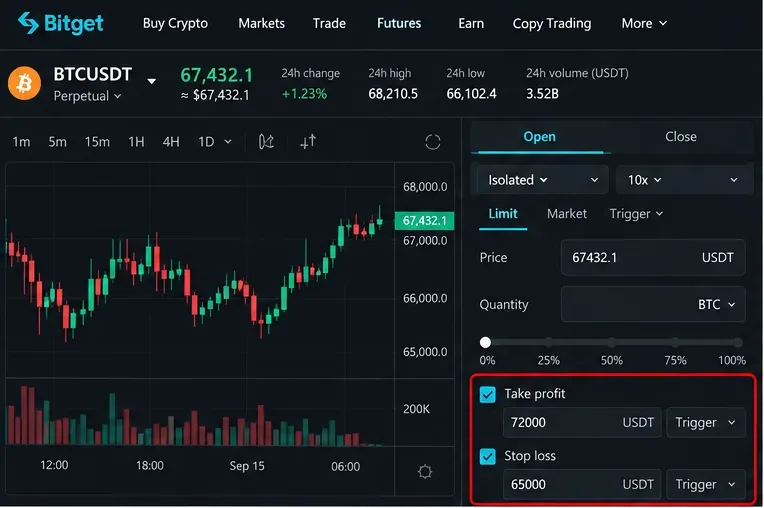
The basic order panel lets you choose an order type, enter price or quantity where applicable, and then choose a direction. Bitget supports several futures order types. The core ones most users encounter first are:
Limit order: you set a price. The order rests or executes only under the price conditions specified.
Market order: the system seeks immediate execution at the best available prices. The final average fill can differ from the price visible when you clicked, especially in fast markets or thin books.
Trigger order: the order is submitted only after a preset trigger condition is reached.
Trailing stop: an advanced conditional tool that follows favorable price movement according to configured parameters.
Bitget also documents advanced limit, scaled, iceberg, and TWAP orders for more specialized execution needs. You do not need to use an advanced order merely because it is available; the important question is whether you understand exactly what happens when the order is submitted, triggered, partially filled, or canceled.
The order ticket combines order type, price, quantity, and direction. A market order prioritizes execution; a limit order prioritizes a specified price condition.
Step 6: add take-profit and stop-loss controls before or after entry
Bitget provides TP/SL controls in the order-entry workflow and in the position-management area. A take-profit instruction is designed to close a position when a specified favorable condition is reached; a stop-loss instruction is designed to close or reduce the position when an adverse condition is reached.
The key detail is that a trigger is not the same thing as a guaranteed fill. Bitget’s support documentation explains that a TP/SL order has a trigger stage and an execution stage. Once the trigger condition is met, a market or limit order is submitted according to the selected settings. In volatile conditions, the resulting order can fill at a different price, fill only partially, or fail to fill if its execution conditions cannot be met.
TP/SL controls can be configured with the entry or managed later from the position panel. Always distinguish the trigger price from the eventual execution price.
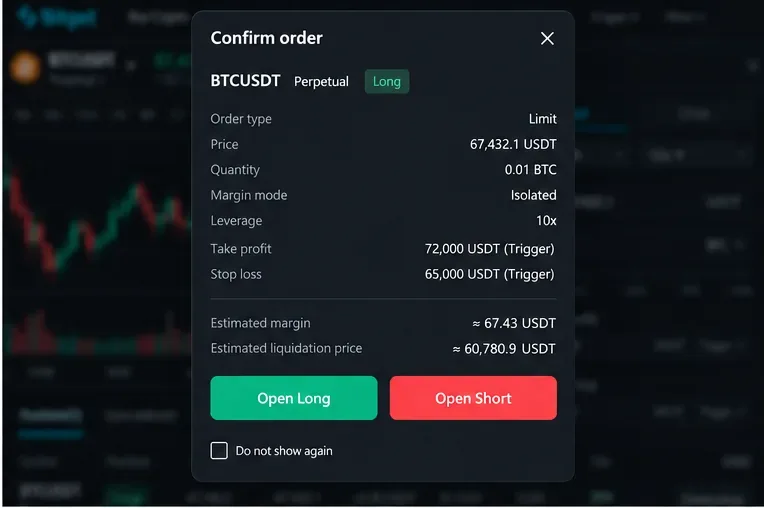
Step 7: review the confirmation details before submitting
Before sending the order, review the pair, direction, order type, price, quantity, margin mode, leverage, estimated margin, and any TP/SL settings. If the interface provides an estimated liquidation price, treat it as an important risk reference rather than a fixed guarantee; maintenance-margin tiers, position changes, fees, funding, and account equity can affect liquidation conditions.
Also confirm whether the interface is operating in Hedge Mode or One-way Mode. Bitget says Hedge Mode is the default for futures and allows simultaneous long and short positions in the same contract. One-way Mode holds net exposure in a single direction. Bitget also notes that you cannot switch between these position modes while relevant positions or pending orders remain open.
Use the confirmation step as a final error check: contract, side, quantity, leverage, margin mode, and conditional exits should all match your intended setup.
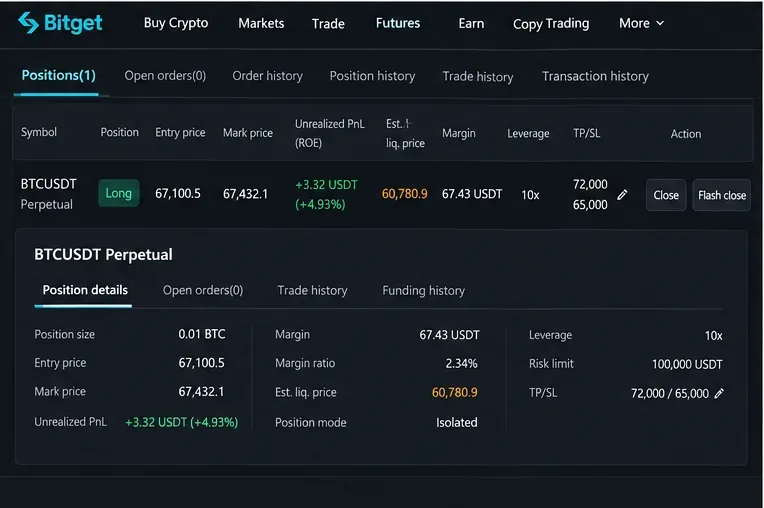
After an order fills, move your attention to the Positions section. Bitget’s website guide says this panel shows position information including unrealized PnL and estimated liquidation price and provides controls for margin and TP/SL management.
The most useful fields to watch are:
Entry price: the average price at which the position was established.
Mark price: a reference price used for unrealized PnL and liquidation calculations.
Unrealized PnL: the position’s estimated profit or loss before closing.
Margin: the collateral currently supporting the position.
Leverage: the current leverage setting.
Estimated liquidation price: a risk indicator showing where liquidation conditions may be reached under current assumptions.
TP/SL: any active conditional exit instructions.
The Positions panel is the main risk-monitoring area after entry. Mark price, margin, liquidation estimate, and TP/SL deserve more attention than short-term chart movement alone.
How do fees and funding fit into the interface?
Futures costs are not fully represented by entry and exit prices. Bitget’s August 2026 trading-fee FAQ lists standard futures base rates of 0.02% for maker trades and 0.06% for taker trades, before VIP-level or promotional adjustments. Because account-specific fees can differ, check the live fee schedule before trading rather than assuming the standard rate will apply.
Perpetual futures can also involve funding payments between long and short position holders. Bitget’s futures-fee guide says funding is commonly settled at eight-hour intervals, although settlement frequency can differ by contract or market conditions. Funding is not the same as a trading fee charged by the exchange; it is a periodic payment mechanism between market sides. See Bitget’s Trading Fees FAQ and Bitget’s futures fees guide.
Step 9: close or reduce the position carefully
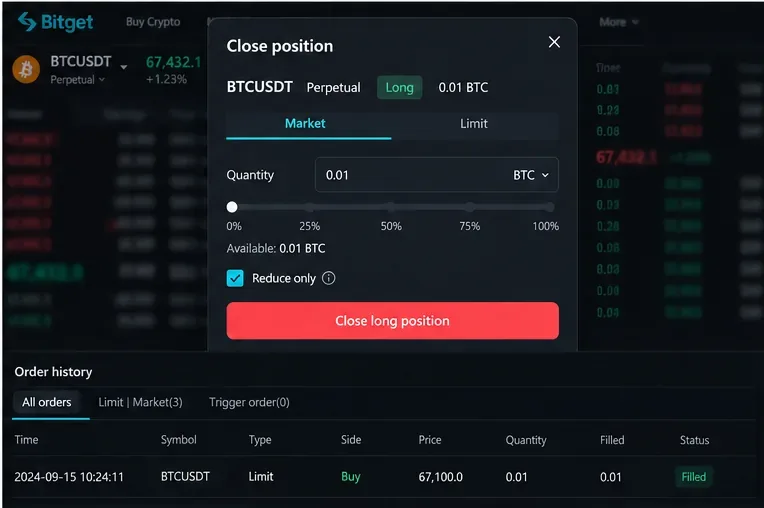
To exit, use the position’s Close control and choose the quantity and order type. A market close prioritizes immediate execution; a limit close specifies a price condition and may remain unfilled. If you only want to reduce an existing one-way position without accidentally opening exposure in the opposite direction, a reduce-only control is important. Bitget specifically documents reduce-only as a tool for one-way mode to ensure an order reduces rather than increases the position.
When closing, verify quantity, order type, and reduce-only behavior. A submitted close order is still subject to market liquidity and execution conditions.
A practical pre-trade checklist
Confirm the exact futures family and contract.
Check whether your account is classic or Unified Trading Account.
Verify cross versus isolated margin.
Check Hedge Mode versus One-way Mode.
Set leverage based on the resulting position size and liquidation sensitivity, not the multiplier alone.
Choose an order type you understand.
Review quantity and notional exposure.
Check estimated margin and liquidation information.
Add TP/SL only after understanding the trigger and execution behavior.
Review current maker/taker fees and the contract’s funding information.
After entry, monitor mark price, margin, unrealized PnL, and liquidation risk.
When exiting, verify whether the closing order can accidentally increase or reverse exposure.
What has changed recently on Bitget?
The biggest interface-related change for many users in 2026 is the expansion of Bitget’s Unified Trading Account. Bitget announced that UTA became available to all users in June 2026, removing the previous asset threshold. The platform has also continued migrating parts of its classic futures infrastructure toward UTA. This means older tutorials that always instruct you to transfer assets from Spot to Futures may not match what a UTA user sees today.
Bitget also continues to change contract-level risk parameters. In 2025 it introduced maximum order-size limits for USDT-M futures, and its current contract announcements repeatedly note that leverage, tick size, maintenance-margin rates, and related parameters can be adjusted as market conditions change. Treat the live trading page and current Bitget support documentation as the authoritative source for any pair-specific limit.
Final takeaway
The Bitget futures interface is easiest to understand when you treat it as a sequence rather than a single order form: choose the contract, confirm the account structure, select margin mode, set leverage, choose an order type, define the position size, configure risk controls, review the order, and then monitor the resulting position. The most consequential settings are often the least visually dramatic—margin mode, leverage, position mode, trigger logic, and reduce-only behavior.
Interface labels and layouts can change as Bitget updates the platform, especially during the ongoing UTA migration. If a button or field appears in a different location than shown in this reference, rely on the current Bitget support documentation and the labels shown in your live account rather than forcing an older workflow onto a newer screen.