Home
» News
»
Yield Farming Strategies: Maximize APY While Limiting Impermanent Loss
Yield Farming Strategies: Maximize APY While Limiting Impermanent Loss
The most important rule in yield farming is simple: optimize for net return after impermanent loss, fees, token-price changes, and transaction costs—not the highest displayed APY. A 40% advertised annual percentage yield can be worse than an 8% opportunity if the first strategy exposes you to a volatile token pair, falling incentive tokens, repeated rebalancing costs, or a large divergence from simply holding the assets.
That makes the best starting strategy for many cautious farmers a pool of strongly correlated assets, a broad liquidity range, or even lending rather than automated-market-maker liquidity when avoiding impermanent loss matters more than maximizing fee income. More aggressive concentrated-liquidity positions can earn more fees per dollar while they remain in range, but they require more monitoring and can amplify the economic cost of price divergence.
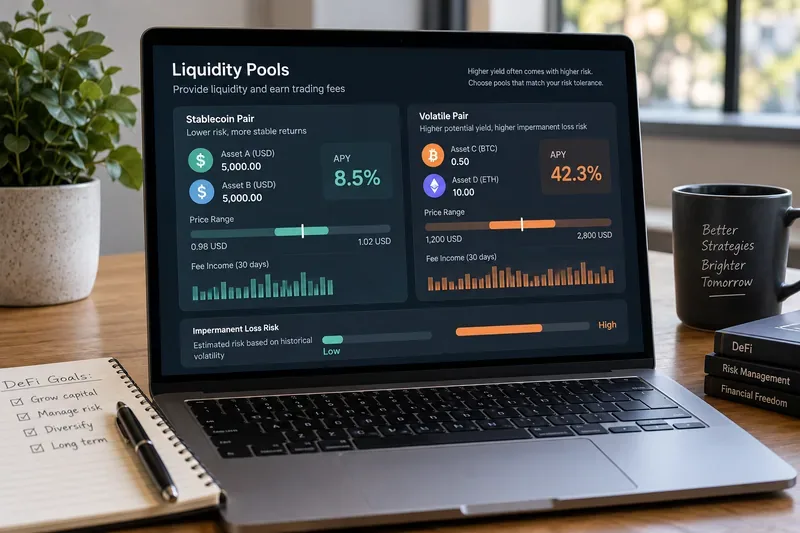
An illustrative liquidity-pool comparison highlights the core trade-off: higher advertised yield can come with greater price-range and impermanent-loss risk.
Start with net yield, not headline APY
Yield farming generally means putting crypto assets to work in decentralized finance (DeFi) to earn trading fees, lending interest, token incentives, or a combination of those rewards. APY, or annual percentage yield, expresses an annualized return that assumes compounding. It is useful for comparing opportunities only when you understand what produces the yield and how stable that yield is likely to be.
For an automated market maker (AMM), liquidity providers deposit assets into a pool that traders use for swaps. On Uniswap, for example, active liquidity earns a proportional share of swap fees. Uniswap v3 and v4 use concentrated liquidity, meaning an LP chooses the price range in which capital is active. When market price leaves that range, the position stops earning fees until price returns. The protocol's current developer documentation explains this behavior in its concentrated liquidity guide.
A practical return estimate therefore looks more like this:
Net return = trading fees + lending interest + incentive value − impermanent loss − gas and management costs − other losses.
Do not treat that as a prediction formula. Future volume, volatility, incentive-token prices, and utilization are unknown. It is a checklist for identifying where a displayed APY can diverge from the return you actually keep.
What impermanent loss actually means
Impermanent loss (IL) is the opportunity cost of providing liquidity compared with simply holding the original tokens when their relative prices change. Uniswap's current glossary describes IL in essentially those terms, and its impermanent-loss explanation shows how AMM rebalancing changes the mix of tokens owned by the LP.
For a classic full-range, 50/50 constant-product pool, a useful simplified formula is:
IL = 2 × √r / (1 + r) − 1, where r is the relative price change between the two assets.
If one token doubles relative to the other, r = 2. The formula gives about −5.72%. In other words, before adding trading fees or incentives, the LP position is worth about 5.72% less than simply holding the original two-token portfolio. If the relative price triples, the shortfall is about 13.4%. These examples apply to the classic full-range constant-product model; concentrated-liquidity positions have different payoff shapes and can experience greater divergence over the active range.
Strategy 1: Prefer correlated pairs when limiting IL is the priority
If preserving capital relative to a hold benchmark matters more than chasing maximum fee yield, begin with assets expected to track one another closely. Examples can include two credible dollar-pegged stablecoins or two representations of the same underlying asset. Smaller relative price moves generally mean less AMM rebalancing away from the original portfolio.
Curve's StableSwap design was built specifically for assets expected to trade near the same value. Its original StableSwap paper describes an invariant designed to provide low-slippage trading near balance while behaving differently as a pool moves farther from equilibrium.
This does not make correlated pools risk-free. Stablecoins can de-peg, wrapped assets can lose backing, bridges can fail, and smart contracts can be exploited. Correlation lowers one source of IL only when the economic relationship between the assets continues to hold.
When this fits
You want a lower-volatility starting point.
You would be comfortable holding either asset independently.
You understand the issuer, collateral, redemption, or bridge risks behind both tokens.
The expected fee and incentive income is meaningful after network costs.
Strategy 2: Use wider ranges unless you have a reason to manage actively
Concentrated liquidity can make capital far more efficient because you place liquidity only where you expect trading to occur. That can raise fee income per dollar of active liquidity. The trade-off is that a narrower range is more likely to be crossed by normal volatility.
Uniswap's documentation states that when price exits a v3 or v4 position's range, the position becomes inactive and no longer earns fees; as price moves toward a boundary, the position is progressively converted into one token. That is why “narrower is better” is not a general rule. A tight range can be attractive for a genuinely stable pair, but it can be fragile for ETH versus a dollar stablecoin during a volatile week.
A sensible range should reflect expected volatility and how often you are willing to rebalance. If you cannot monitor the position regularly, a wider range sacrifices some fee concentration in exchange for more time in range. If you do manage actively, include the network fees, swap costs, taxes where applicable, and the possibility of rebalancing at unfavorable prices in your return calculation.
Strategy 3: Compare fee yield with the IL you are being paid to absorb
Trading volume matters because swap fees are the primary economic compensation LPs receive for making markets. A high total value locked (TVL) pool with little trading may generate less fee income per dollar than a smaller but actively traded pool. Conversely, a high-volume volatile pair can generate substantial fees while still underperforming a hold strategy if price divergence is large.
Before entering, write down a break-even question: How much fee and incentive income would I need to offset a plausible amount of IL over my intended holding period? For a volatile 50/50 full-range pair, you can run several relative-price scenarios using the formula above. For concentrated liquidity, use a position-specific simulator or calculate the payoff from the actual range rather than applying the full-range formula.
Strategy 4: Consider lending when you want yield without AMM impermanent loss
You do not need to provide two-sided AMM liquidity to earn on-chain yield. Lending protocols pay suppliers interest generated by borrowers. Aave explains that supply rates vary with utilization: as the proportion of supplied liquidity being borrowed changes, the supply rate changes as well. Its supply documentation also makes clear that rates are variable rather than fixed.
Lending removes the specific two-asset rebalancing mechanism that creates AMM impermanent loss, but it introduces different risks: smart-contract failure, collateral liquidation shortfalls, stablecoin or asset-price risk, and temporary withdrawal constraints when available liquidity is low. Aave's risk disclosures explicitly note those possibilities.
When lending may fit better
If your main objective is to retain exposure to one asset, a lending position can be easier to reason about than pairing that asset with another token in an AMM. Compare the lending supply rate with a conservative estimate of LP fee income after IL rather than comparing lending APR with an LP's headline incentive APY.
Strategy 5: Treat token incentives as a bonus, not guaranteed income
Many farms advertise yield that includes emissions of a governance or reward token. That creates a second market bet: the strategy's return depends not only on the underlying assets and fee generation, but also on the reward token's price. If emissions attract capital faster than trading activity grows, yield can fall. If the reward token drops sharply, realized APY can be far below the rate shown when you entered.
A useful discipline is to calculate two numbers: yield from organic sources such as fees or borrower interest, and yield from token incentives. If the strategy only looks attractive with aggressive incentive assumptions, classify it as higher risk.
How to choose among common yield-farming approaches
Approach
Main return source
IL exposure
Management burden
Best fit
Single-asset lending
Borrower interest
None from AMM rebalancing
Low to moderate
Investors who want to keep one-asset exposure
Correlated-asset AMM pool
Swap fees + possible incentives
Usually lower while correlation holds
Moderate
Cautious LPs who understand de-peg and contract risk
Wide-range volatile pair
Swap fees + possible incentives
Meaningful
Moderate
LPs willing to own both assets through large moves
Narrow concentrated range
Higher fee density while in range
Potentially high
High
Active LPs with a clear volatility/range thesis
High-emission farm
Reward-token emissions
Depends on underlying position
High
Risk-tolerant users who can value and monitor rewards
A pre-deposit checklist for maximizing risk-adjusted APY
Understand both assets. Do not LP a token you would be unwilling to hold after a large price move.
Separate organic yield from incentives. Ask what remains if reward-token emissions fall materially.
Check the range logic. For concentrated liquidity, estimate how often normal volatility could push the position out of range.
Stress-test relative prices. Model at least a mild, moderate, and severe divergence scenario.
Account for all costs. Include deposits, withdrawals, swaps, rebalancing, bridging, and harvesting.
Check pool depth and volume. TVL alone does not tell you how much fee income your capital will earn.
Review protocol and asset risks. Audits reduce uncertainty but do not eliminate smart-contract, oracle, governance, bridge, or de-peg risk.
Use position size as a risk control. A strategy can be technically sound and still be inappropriate if a single failure would materially damage your portfolio.
What a good yield-farming decision looks like
The goal is not to eliminate impermanent loss entirely. The goal is to be compensated for the risks you deliberately take. A strong strategy starts with assets you are willing to own, chooses a pool design that matches their expected relationship, sets a range appropriate for volatility and monitoring frequency, and treats fees and incentives as uncertain rather than guaranteed.
For a beginner prioritizing downside control, a sensible progression is usually: understand single-asset lending first, then study correlated-asset pools, then experiment with small wide-range LP positions before attempting tight concentrated-liquidity strategies. For an experienced, active LP, narrower ranges can improve capital efficiency—but only if the added fee income consistently exceeds the costs of divergence, downtime outside the range, and active management.
Bottom line: the best yield farm is not the one with the highest APY on the screen. It is the one whose expected net return remains attractive after realistic assumptions about impermanent loss, changing rates, token incentives, and operating costs.